Another day in Paradise with Microsoft. 🙂
Today my task was to set up HTTPS on the test environment with Azure Application Gateway, but the end of the day it was done.
The environment is in the Azure Cloud, consists of an Application Gateway, and an Ubuntu application server on a subnet. The Application Gateway documentation can be found on the following link:
https://docs.microsoft.com/en-us/azure/application-gateway/application-gateway-ssl-portal
As usual it is just a Microsoft guide which is not enough to complete the process.
My setup and resources were:
- Azure Application Gateway
- Web application backend running on Ubuntu server
- Windows desktop
So lets see the steps for this task:
1. Create a self-signed Certificate
- On the Ubuntu backend install openssl if it has not been installed already.
- Use the following commands to create the necessary keys and certificate:
root@ubuntu:~#openssl req -x509 -newkey rsa:4096 -sha256 -nodes -keyout example.key -out example.crt -subj "/CN=cloudapp.net" -days 36
root@ubuntu:~#openssl pkcs12 -export -out example.pfx -inkey example.key -in example.crt -certfile example.crt
Set a password when creating the key and certificate.
2. Create a HTTPS Listener on the Gateway
On the Azure Portal navigate to your Gateway / Listeners and click on Add basic listener.
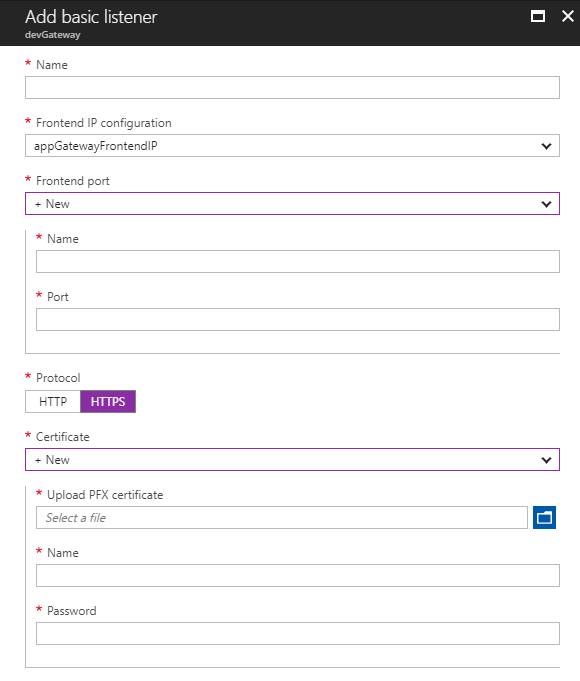
- Fill Name
- From the Frontend port dropdown select +New
- Add a Frontend port Name
- Port 443
- Protocol HTTPS
- From the Certificate dropdown select +New
- Upload the .pfx file you have created on the Ubuntu server
- Add a name
- Type the same password that was entered when the .pfx was created
If you got the error:
Failed to save configuration changes to application gateway 'Gateway'. Error: Certificate /subscriptions/your_long_subscription_identifier/resourceGroups/your_resource_group_name/providers/Microsoft.Network/applicationGateways/devGateway/sslCertificates/cloudapp.net is invalid as it has more than one Private Key.
then here is the workaround:
- On the ubuntu server run the command:
root@ubuntu:~#openssl pkcs12 -in example.pfx -out example.pem
- Edit the example.pem with your favorite editor
- Remove the CERTIFICATES from the file and leave only one starting with:
Bag Attributes: <No Attributes>
subject=/CN=
and ending with:
-----END CERTIFICATE-----
- Leave the Encrypted private key in the file
- Re-create the .pfx file with the following command:
openssl pkcs12 -in original.pem -export -out fixed.pfx
- Repeat the steps of the Chapter 2. Create a HTTPS Listener on the Gateway
3. Create a HTTPS Health Probe for the Gateway HTTP Settings
On the Azure Portal navigate to your Gateway / Health probe and click on Add health probe.
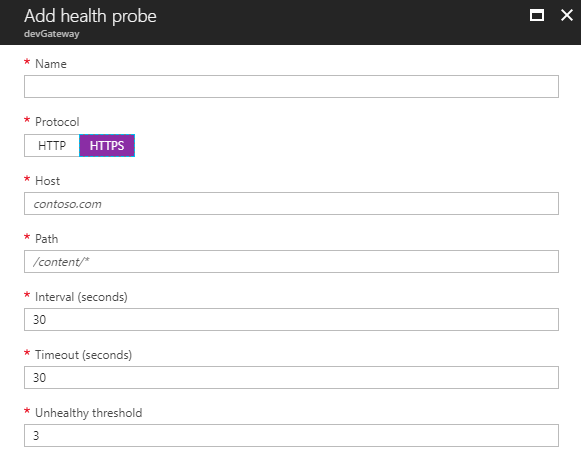
Please note it is very important to set up proper health probes because without them you will always receive HTTP 502 error even if your backends are up and running but without the proper health probe the gateway will think that the backends are down and reports an error.
- Add Name
- Set Protocol to HTTPS
- Set Host (Eg. 10.0.0.x)
- Path (Eg. index.html. It must exist on the backend server!)
- Leave the other settings with the default values.
4. Create a Backend Authentication Certificate
Because Azure accepts only CER certificate I converted the .crt to .cem. The easiest way to use Microsoft Certificate Export Wizard on a Windows desktop.
- Double click on the .crt file.

- Click Copy to File…
- In the Certificate Export Wizard Dialog choose Base-64 encoded X.509 (.CER)
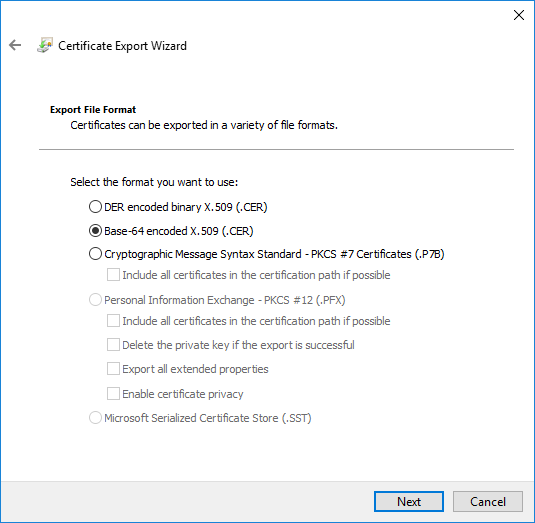
- Save .cer file
5. Adding a New HTTP Setting for a Gateway Rule
On the Azure Portal navigate to your Gateway / HTTP settings and click on Add.

- Add Name
- Set Cookie based affinity to Disabled
- Set Protocol to HTTPS
- Set Port to 443
- Under the Backend authentication certificates select Create new, add a Name and upload the .cer file
- Tick Use custom probe and select the Probe you have created before
6. Create or Modify Gateway Rule
If HTTPS communication needed between the Gateway and the backend you have to modify the Gateway rules and set up the Webserver with SSL.
So it is a prerequisite to set up Apache2 or NGINX to be able to communicate via HTTPS.
Then on the Azure Portal navigate to your Gateway / Rules and click on Add or edit your existing rule.
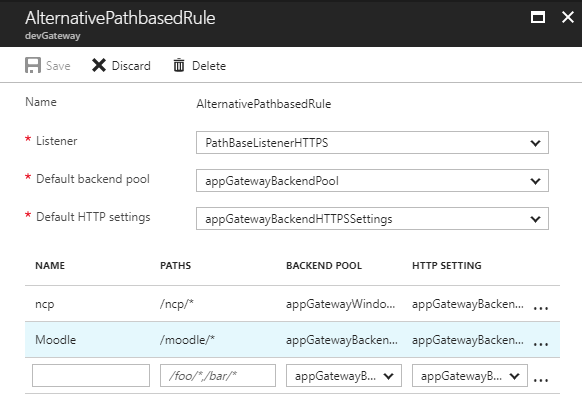
- For the Default HTTP setting add the new HTTPS setting
- If you are using Path-based rule, change the HTTP SETTINGS for each backend
The next step should be to redirect HTTP to HTTPS on this Gateway but that will be another great task to do. For PowerShell users here is the Microsoft documentation for this:
It was easy wasn’t it? Of course not. 🙂
Cheers.
3 thoughts to “Microsoft Azure Step-by-step Guide to Set Up SSL with self-signed Certificate on an Ubuntu Backend using Azure Application Gateway”
Pingback: My First PowerShell to Redirect HTTP to HTTPS on the Azure Application Gateway – EduRoll IT Blog
Now we have .pfx file upload type , can you explain that reason ?
Hi, where exactly do you have the .pfx upload type?